
Flashing the Hex file using ds30 bootloader
Sharana (talk) 13:47, 7 August 2015 (IST)
We ship ds30 PIC bootloader with various PIC micro-controllers. This quick tutorial explains how to use the bootloader to program the board.
Contents
[hide]Hardware Setup
Basic Connections
You basically need a USB to UART board and target MCU with pins taken out. Remember some of our boards are shipped with the serial adapter board. If you do not have one, you may purchase the nice little board below:

Most of the Explore Embedded PIC Development boards come with standard pin breakouts for the UART. These come with a female header and and the UART comes with a corresponding male header. You can directly plug and mate them.
In case, you do not have this setup you'll have to make the connections listed below:
| USB to UART | PIC Micro-controller | e.g PIC16877A pins/names |
|---|---|---|
| RXD | TXD | 25 (RC6/TX) |
| TXD | RXD | 25 (RC7/RX) |
| DTR | RESET | 1 (MCLR) |
| GND | GND | 12 (VSS) |
| VCC | VCC | 11 (VDD) |
The images below show the connections for the PIC Ultra Development board and also the breakout out board. You can use any of the ways, depending the boards that you have.
Ensure that the DTR jumper is placed as shown in the images. Connection with the Ultra PIC base board

Connection with the PIC breakout board

Software Setup and usage
Download and install the DS30 bootloader gui.

- Browse the hex file
- Select the appropriate MCU
- Select the baud rate as 9600
- Select the correct com port detected on your computer, when using USB to serial convertor check for exact COM port number in device manager
Step 3: The board uses DTR pin of the CP2102 USB to Serial Convertor to reset the MCU. Set it up as shown in the image below.

Step 4: Click on the write option to flash the hex file,. Images below show the sequence.

...detects bootloader
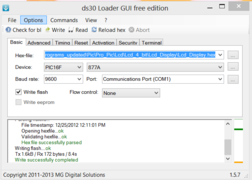
...finishes flashing.


Resources and Downloads
Restoring the bootloader
In case you've replaced or damaged the IC shipped with the board, follow the tutorial below:
- Restoring the bootloader