
Interfacing Seven Segment Displays with AVR
In the earlier tutorials we saw how to interface the Leds to Atmega32 and wrote the code to blink, generate up counter, ringcounter etc. How ever the leds cannot be used to display any user information like numbers, char's etc. To display numeric values we can use seven segment displays.
In this tutorial we will interface a seven segment to ATmega32 and display a single digit hex counter(0-F). Later same will be extended to multiplex 4 seven segment displays to generate a 4-digit counter.
Contents
[hide]Seven Segment Display

Well, the name 7 segments implies there are 7 LED segments arranged as shown in figure 1. After LEDs, these are the easiest interfaces to a microcontroller. There is also a decimal point or dp. It is used when decimal digits like 5.1 etc are displayed.
Applications
Seven segment are widely used in applications where digits[0-9] are required to be displayed.Although they also display letters A to F as shown in figure(2) simulation. This is a very simple and convenient way to display numbers in a bright fashion.
Form Factor
- Sizes:They come in various sizes; 0.28”, 0.3”, 0.32”, 0.36”, 0.39”, 0.4”, 0.5”, 0.56”, 0.6”, 0.8”, 1.0”, 1.2”, 1.5”, 1.8”, 2.0”, 2.3”, 3.0”, 4.0”, 5.0”, 7.0”)
- Colors: and varied colors too; Red, Green, Yellow, Orange, Blue, and White.
Working


Since these are basically LEDs arranged as a group they can either have anode in common or cathode thus they are named as Common-Anode/Common-Cathode displays.
- Common Cathode: In this type of segments all the cathode terminals are made common and tied to GND. Thus the segments a to g needs a logic High signal(5v) in order to glow.This is shown in figure(3).
- Common Anode: In this type of segments all the anodes terminals are made common and tied to VCC(5v). Thus the segments a to g needs a logic LOW signal(GND) in order to glow.This is shown in figure(4).
Hookup

Code
| #include <avr/io.h> | |
| #include <util/delay.h> | |
| #define SegOne 0x01 | |
| #define SegTwo 0x02 | |
| #define SegThree 0x04 | |
| #define SegFour 0x08 | |
| int main() { | |
| char seg_code[]={0xc0,0xf9,0xa4,0xb0,0x99,0x92,0x82,0xf8,0x80,0x90,0x88,0x83,0xc6,0xa1,0x86,0x8e}; | |
| int cnt, num, temp,i; | |
| /* Configure the ports as output */ | |
| DDRB = 0xff; // Data lines | |
| DDRD = 0xff; // Control signal PORTD0-PORTD3 | |
| while (1) | |
| { | |
| for (cnt = 0x00; cnt <= 9999; cnt++) // loop to display 0-9999 | |
| { | |
| for (i = 0; i < 100; i++) | |
| { | |
| num = cnt; | |
| temp = num / 1000; | |
| num = num % 1000; | |
| PORTD = SegOne; | |
| PORTB = seg_code[temp]; | |
| _delay_ms(1); | |
| temp = num / 100; | |
| num = num % 100; | |
| PORTD = SegTwo; | |
| PORTB = seg_code[temp]; | |
| _delay_ms(1); | |
| temp = num / 10; | |
| PORTD = SegThree; | |
| PORTB = seg_code[temp]; | |
| _delay_ms(1); | |
| temp = num % 10; | |
| PORTD = SegFour; | |
| PORTB = seg_code[temp]; | |
| _delay_ms(1); | |
| } | |
| } | |
| } | |
| } |
- Explore Ultra AVR Dev Kit: Buy from EE Store


Video Tutorial
For those of you, who would like to watch instead of read we have made a video with all the gyan.
Downloads
Download the complete project folder from the below link:
https://github.com/ExploreEmbedded/ATmega32_ExploreUltraAvrDevKit/archive/master.zip
Have a opinion, suggestion , question or feedback about the article let it out here!
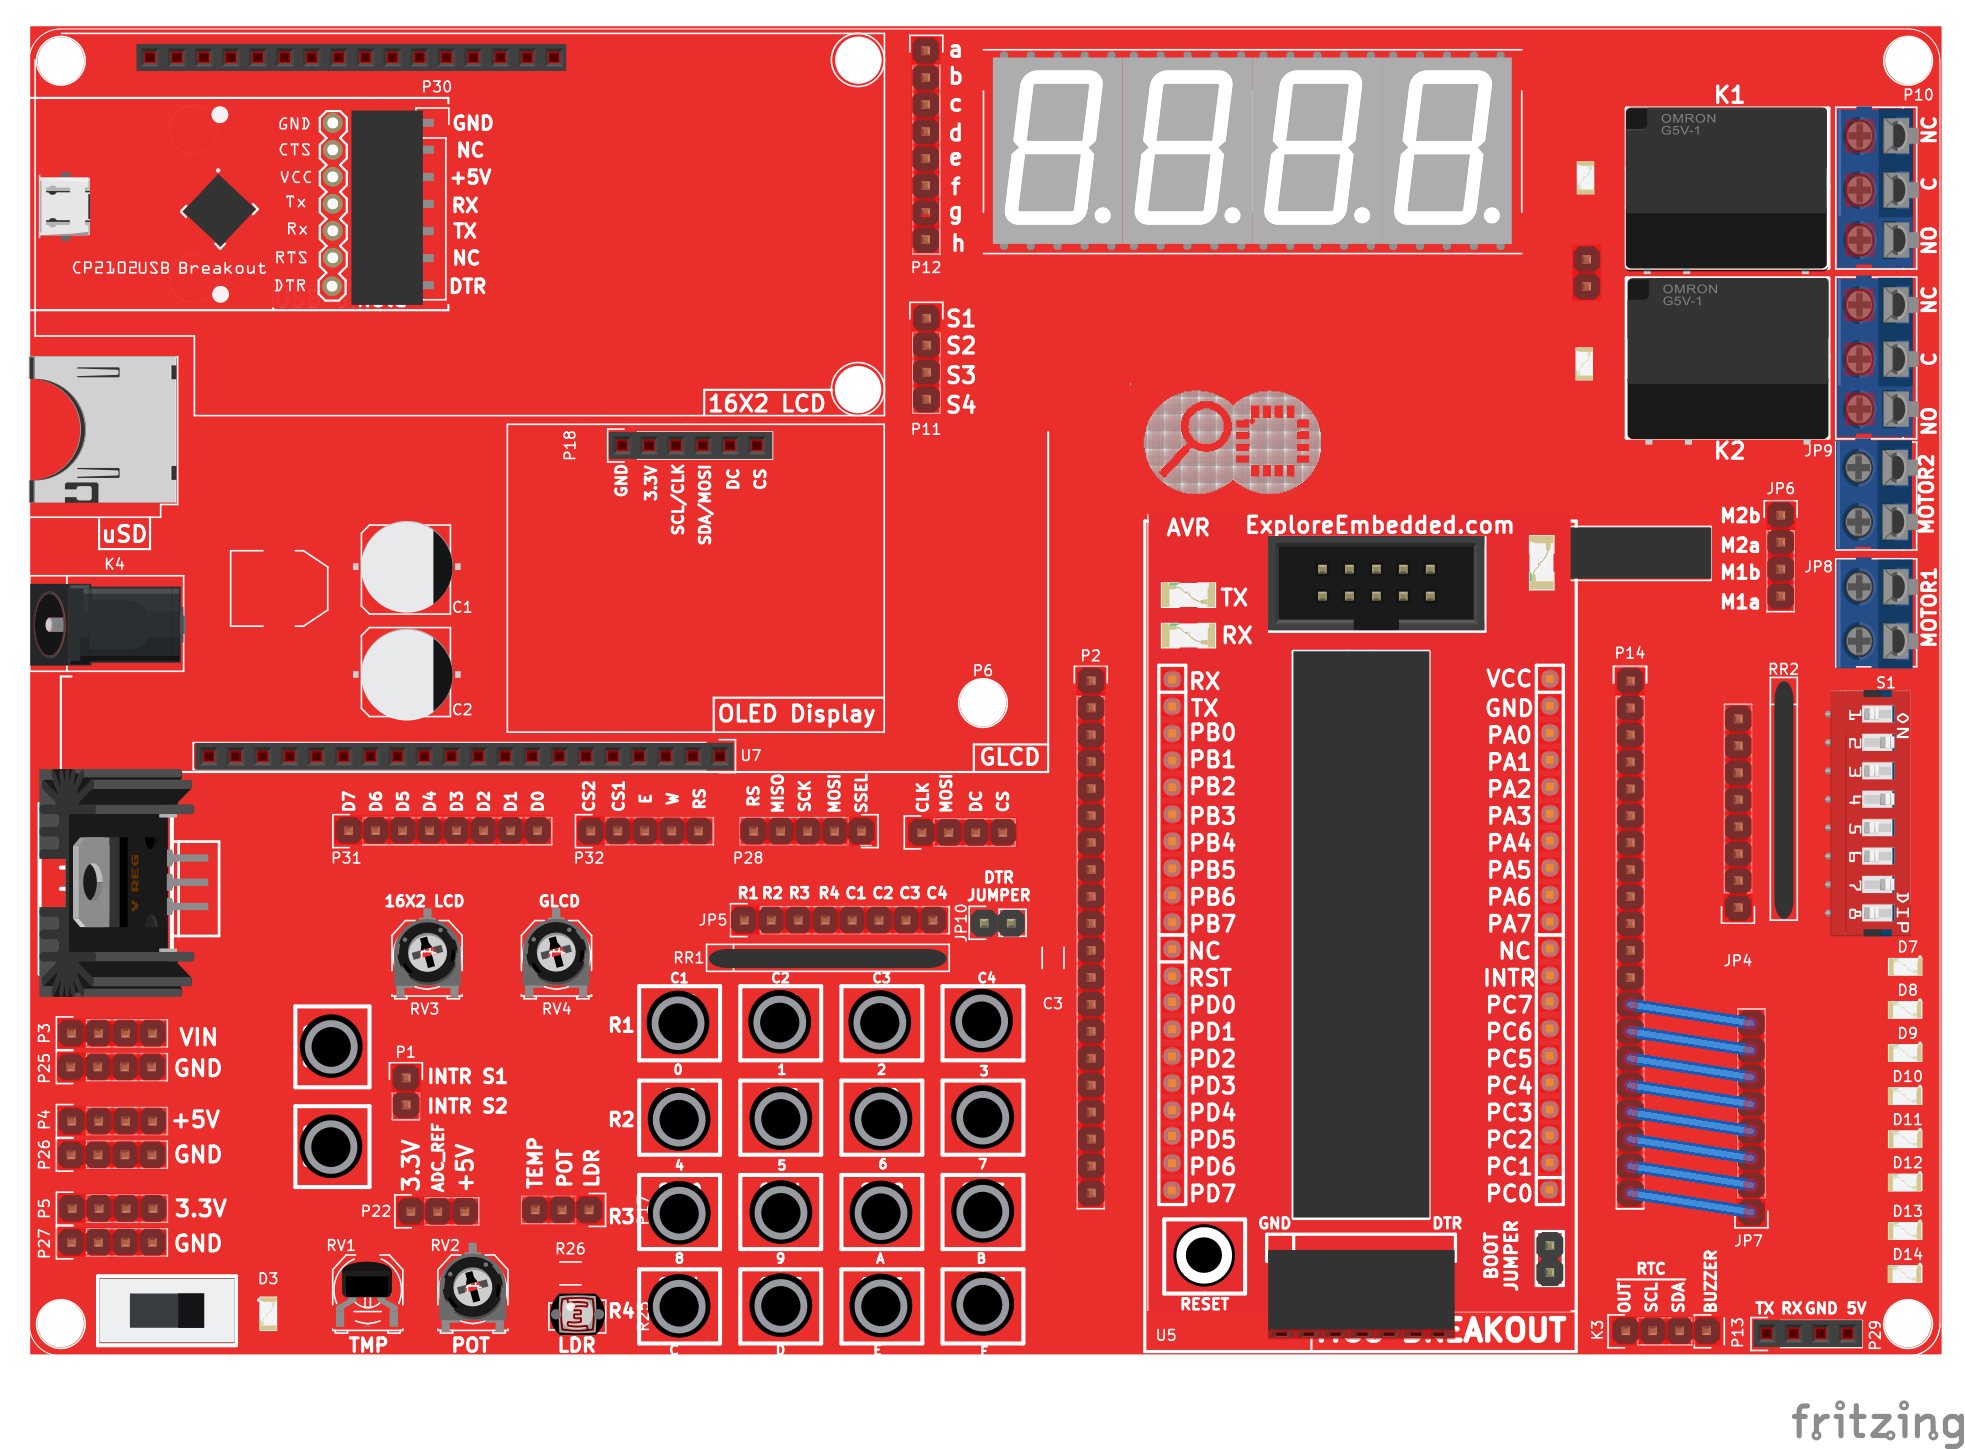
AVR I/O Register Configuration
In this tutorial we are going to discuss the port configuration of AVR/Atmel controllers or in general Atmega family. In this tutorial we will be using Atmega32 as reference, same will be applicable...

Basics of AVR 'C'
Let us look at the basics of 'C' for programming AVR Micrcontrollers in this tutorial. Simple stuff like setting and clearing bits is important to any project you do. It is often required to set...
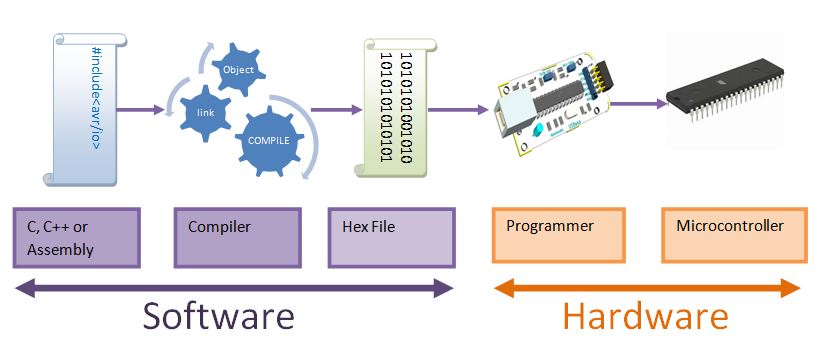
AVR Hardware and Software Setup
In this tutorial we will look at the basic setup required to get started with AVR series of microcontrollers. There are two aspects to it, the software and the hardware. Fortunately, we for AVR...
AVR Timer programming
Basics Timers come in handy when you want to set some time interval like your alarm. This can be very precise to a few microseconds. Timers/Counters are essential part of any modern...