
Difference between revisions of "Reading Temperature with AVR Breakout"
(Created page with "category:Atmega32 Breakout") |
|||
| (11 intermediate revisions by 2 users not shown) | |||
| Line 1: | Line 1: | ||
[[category:Atmega32 Breakout]] | [[category:Atmega32 Breakout]] | ||
| + | In this tutorial we will set up and read the temperature from LM35 using ADC of Atmega32 AVR breakout. | ||
| + | |||
| + | =Basics= | ||
| + | Initially we will read a raw data from ADC. Atmega32 comes with 10-bit 8-channel inbuilt ADC. We will connect 10k Pot to channel 0, vary it and read the raw voltage. After that we will connect the LM35 temperature sensor to channel 0 and read the temperature as shown in hook up. We will display the converted value on terminal.<br/> | ||
| + | Refer [[Reading Temperature with AVR ADC]] for basics of Atmega32 ADC and LM35 temperature sensor. | ||
| + | |||
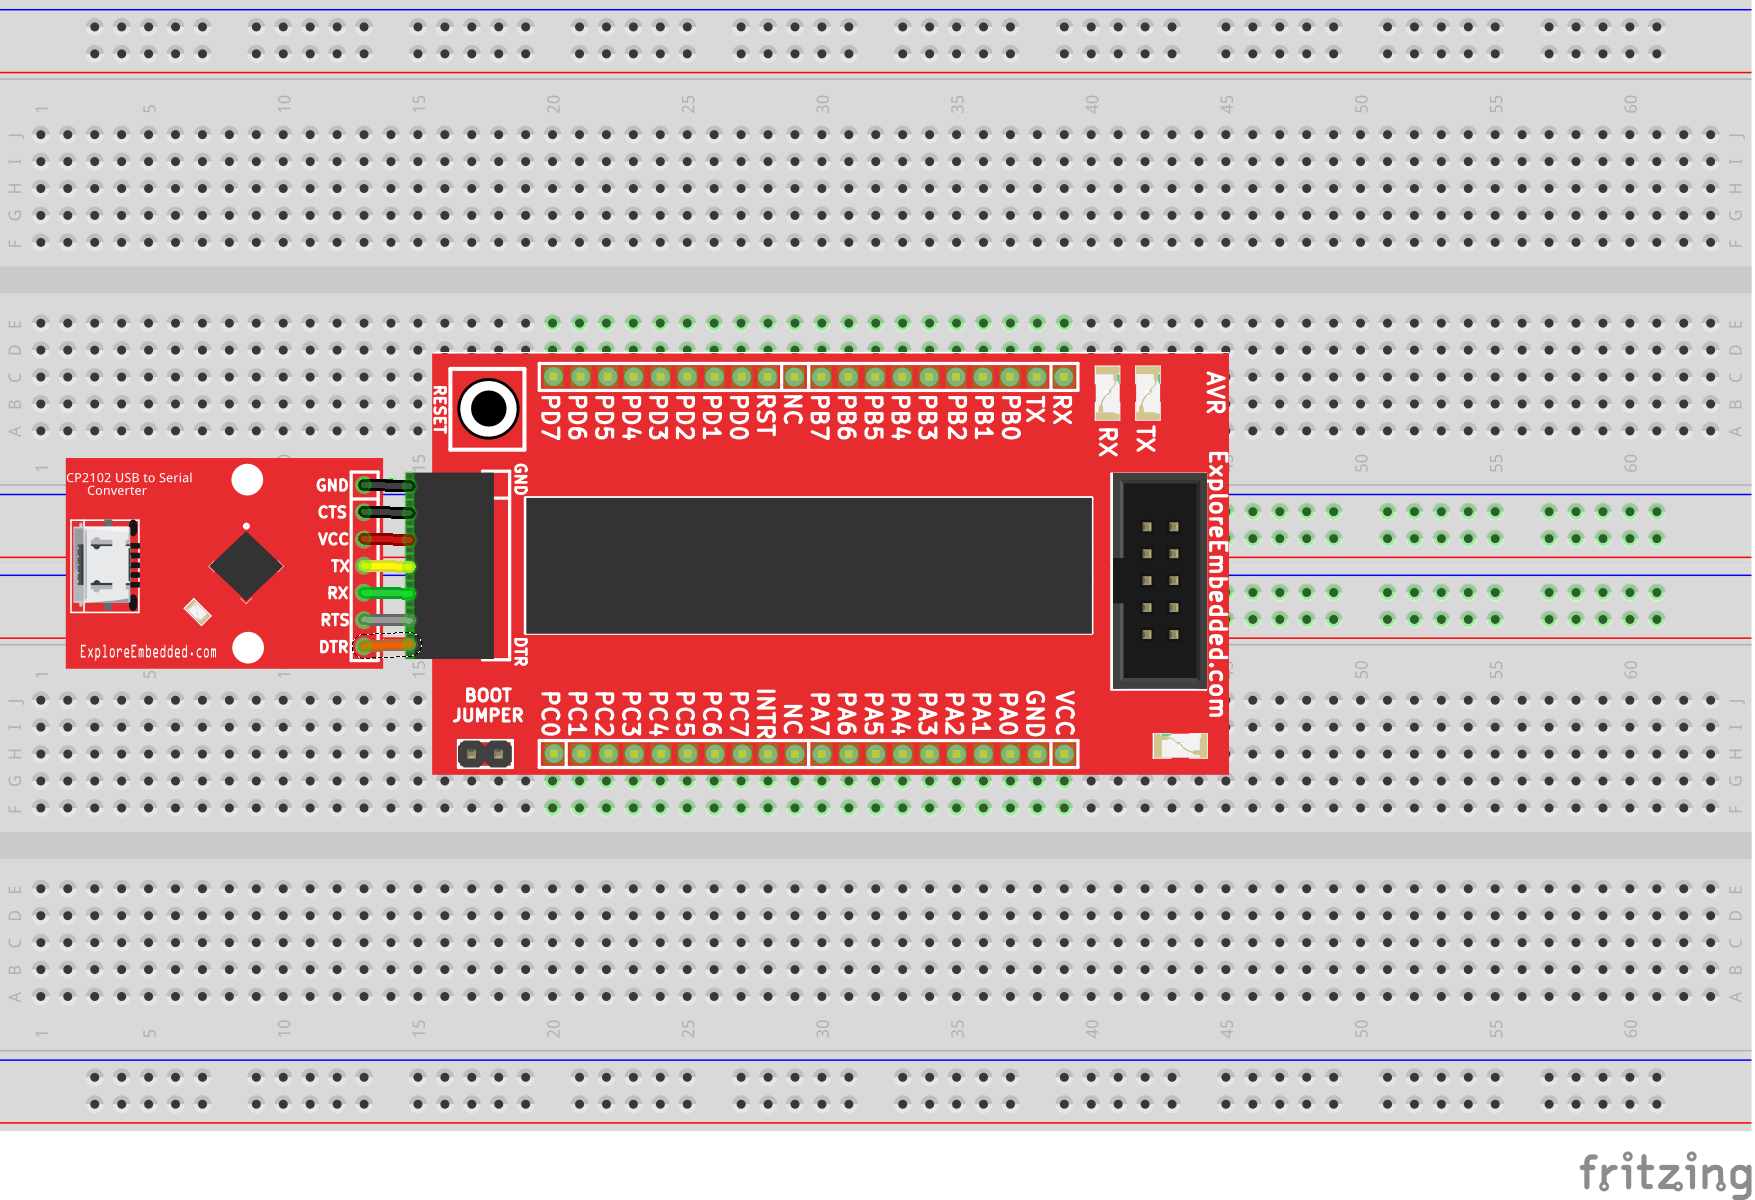
| + | =Hook Up LM35= | ||
| + | [[file:0_Avrbreakout_ADC_temp.png]] | ||
| + | Instead of LM35 temperature we can connect Pot to read the raw data from ADC. | ||
| + | ==Code to Read Voltage== | ||
| + | <html> | ||
| + | <script src="https://gist.github.com/Xplorer001/d46092fcad54a3b628f0.js"></script> | ||
| + | </html> | ||
| + | |||
| + | ==Code to Read Temperature== | ||
| + | <html> | ||
| + | <script src="https://gist.github.com/Xplorer001/b5324c706391fa1e4a77.js"></script> | ||
| + | </html> | ||
| + | <br/> | ||
| + | To display the ADC value open the terminal connect the COM port, we will get output as shown in below image. | ||
| + | [[file:ADC temp.PNG]] | ||
| + | |||
| + | =Downloads= | ||
| + | Download the complete project folder from the below link: | ||
| + | https://github.com/ExploreEmbedded/AVR-MCU-Breakout-Board/archive/master.zip<br> | ||
| + | |||
| + | |||
| + | |||
| + | Have a opinion, suggestion , question or feedback about the article let it out here! | ||
| + | {{DISQUS}} | ||
Latest revision as of 10:19, 20 April 2016
In this tutorial we will set up and read the temperature from LM35 using ADC of Atmega32 AVR breakout.
Contents
[hide]Basics
Initially we will read a raw data from ADC. Atmega32 comes with 10-bit 8-channel inbuilt ADC. We will connect 10k Pot to channel 0, vary it and read the raw voltage. After that we will connect the LM35 temperature sensor to channel 0 and read the temperature as shown in hook up. We will display the converted value on terminal.
Refer Reading Temperature with AVR ADC for basics of Atmega32 ADC and LM35 temperature sensor.
Hook Up LM35
 Instead of LM35 temperature we can connect Pot to read the raw data from ADC.
Code to Read Voltage
| #include "adc.h" | |
| #include "uart.h" | |
| int main() | |
| { | |
| int adcValue; | |
| float volt; | |
| ADC_Init(); /* Initialize the ADC module */ | |
| UART_Init(9600); /* Initialize UART at 9600 baud rate */ | |
| while(1) | |
| { | |
| adcValue = ADC_GetAdcValue(0); // Read the ADC value of channel zero | |
| volt = (adcValue*5.00)/1023; //10bit resolution, 5vReference | |
| UART_Printf("ADC0 Value:%4d Equivalent Voltage:%f\n\r",adcValue,volt); // Send the value on UART | |
| } | |
| return (0); | |
| } |
Code to Read Temperature
| #include "adc.h" | |
| #include "uart.h" | |
| int main() | |
| { | |
| int adcValue; | |
| int temp; | |
| ADC_Init(); /* Initialize the ADC module */ | |
| UART_Init(9600); /* Initialize UART at 9600 baud rate */ | |
| while(1) | |
| { | |
| adcValue = ADC_GetAdcValue(0); // Read the ADC value of channel zero where the temperature sensor(LM35) is connected | |
| /* Convert the raw ADC value to equivalent temperature with 5v as ADC reference | |
| Step size of AdC= (5v/1023)=4.887mv = 5mv. | |
| for every degree celcius the Lm35 provides 10mv voltage change. | |
| 1 step of ADC=5mv=0.5'c, hence the Raw ADC value can be divided by 2 to get equivalent temp*/ | |
| temp = adcValue/2.0; // Divide by 2 to get the temp value. | |
| UART_Printf("ADC0 Value:%4d Equivalent Temperature:%dC\n\r",adcValue,temp); // Send the value on UART | |
| } | |
| return (0); | |
| } |
To display the ADC value open the terminal connect the COM port, we will get output as shown in below image.

Downloads
Download the complete project folder from the below link:
https://github.com/ExploreEmbedded/AVR-MCU-Breakout-Board/archive/master.zip
Have a opinion, suggestion , question or feedback about the article let it out here!
Setting Up AVR Breakout
In this tutorial we will look at the basic setup required to get started with AVR breakout board. After completion of this basic setup we can interface peripherals with the breakout board. ...
Blinky with AVR Breakout
In this tutorial we will get hands on with AVR breakout board. Here we will interface simple LED with one of the port pins. For this tutorial we will require a breadboard, LEDs and resistors. ...
Interfacing LCDs with AVR Breakout
In this tutorial let's interface a 16x1,16x2 and 20x4 character display with AVR breakout board. For this tutorial we will require a LCD Breakout. Basics LCD can be interfaced with...
Interfacing Seven Segment Display with AVR Breakout
After blinking the LED , Let's display user information like numeric value using seven segment display. In this tutorial we will interface a seven segment display to AVR breakout board and display a...